
Stone Zone's Gravel & Chippings Range
Stone Zone's Gravel & Chippings Range
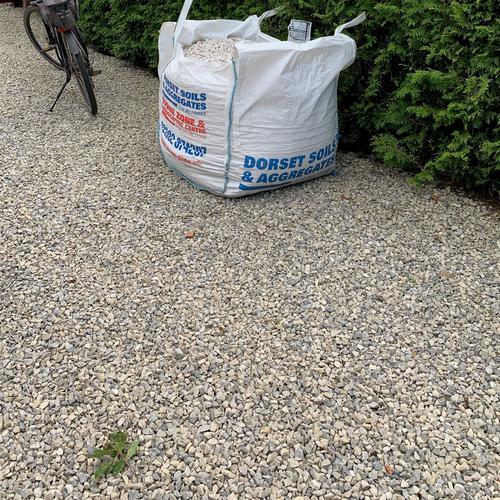
At Stone Zone, we are proud to be one of the largest suppliers of Gravel and Chippings, available for delivery both locally and nationwide. If you are thinking about creating borders and edges in your garden or want to add rockery features with a splash of colour to your patio then we have the products for you. From landscaping needs to more aesthetically pleasing natural stones, we have a wide range from you to choose from. Keep reading at just a glimpse of what we have to offer.

Click HERE to Purchase Black Basalt Chippings. Available in 10mm, 14mm and 20mm.
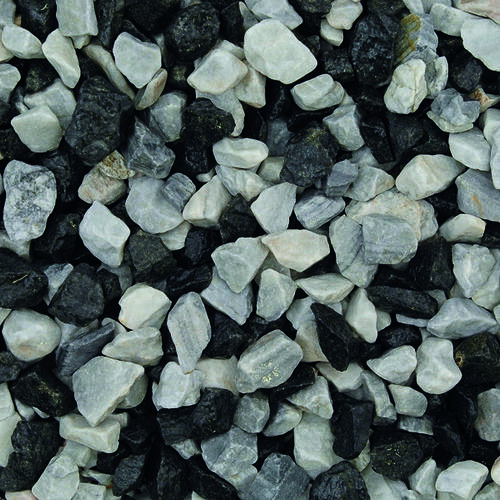
Click HERE to Purchase 20mm Black Ice Chippings

Click HERE to Purchase 20mm Flamingo Chippings
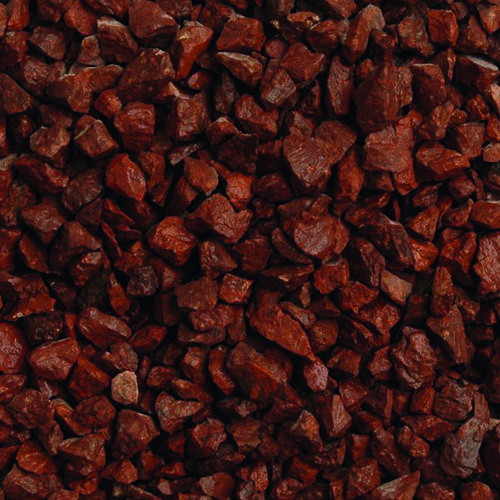
Click HERE to Purchase Red Flame Chippings. Available in 14mm and 20mm.
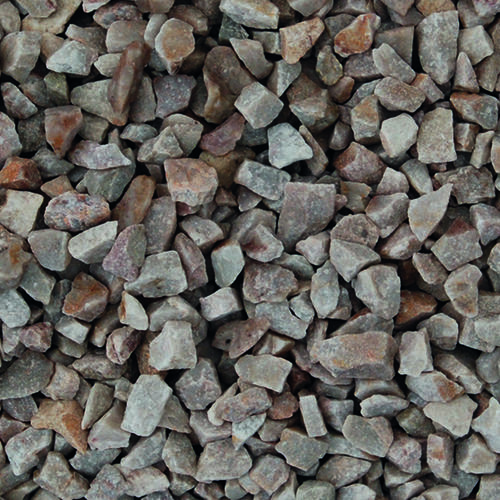
Click HERE to Purchase Heritage Quartz Chippings. Available in 10mm and 14mm.
Gravel and Chippings in Your Garden
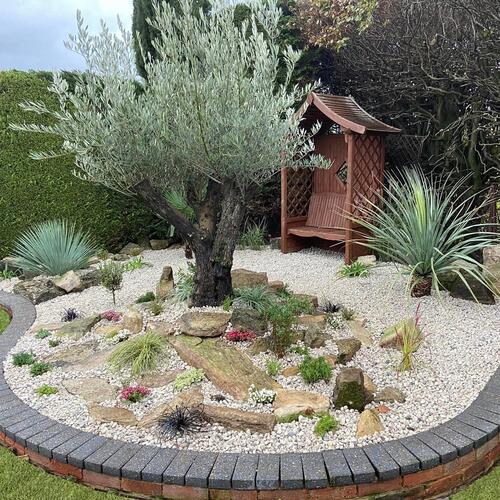
Gravel and chippings are versatile materials that can enhance the functionality and aesthetics of a garden. Here are some of the best uses for gravel and chippings in a garden:
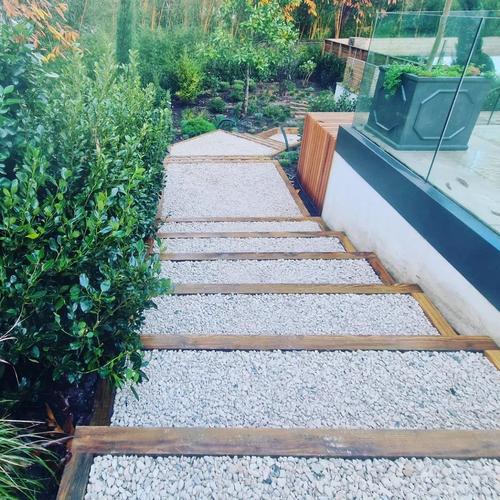
1. Pathways and Walkways
Definition and Accessibility: Gravel paths provide a clear and attractive route through the garden, helping to define different areas and make them accessible.
Drainage: Gravel allows for excellent drainage, preventing puddles and muddy areas on pathways.
2. Driveways
Durability: Gravel is a durable material that can withstand the weight of vehicles, making it a good choice for driveways.
Low Maintenance: Gravel driveways are relatively easy to maintain and can be topped up as needed.
3. Mulching and Soil Protection
Moisture Retention: Gravel helps retain soil moisture and reduces evaporation, which benefits plant health.
Weed Suppression: A layer of gravel or chippings can suppress weed growth, reducing the need for frequent weeding.
4. Decorative Ground Cover
Aesthetic Appeal: Gravel and chippings come in a variety of colours and sizes, allowing you to create a visually appealing ground cover that complements your garden design.
Texture and Contrast: They add texture and contrast to planting areas, enhancing the overall garden aesthetic.
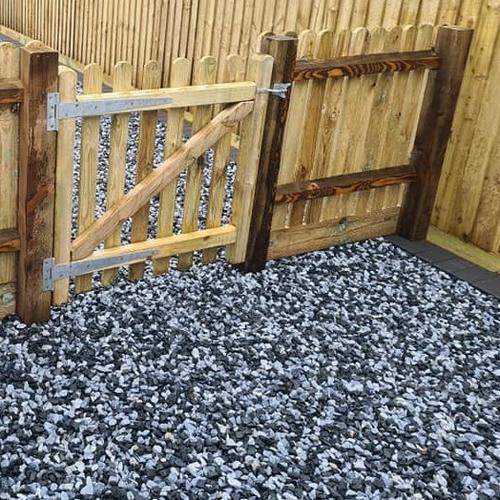
5. Borders and Edging
Neat Boundaries: Use gravel or chippings to create neat, defined borders between lawns, flower beds, and other garden areas.
Erosion Control: They help prevent soil erosion along borders and edges, especially on slopes.
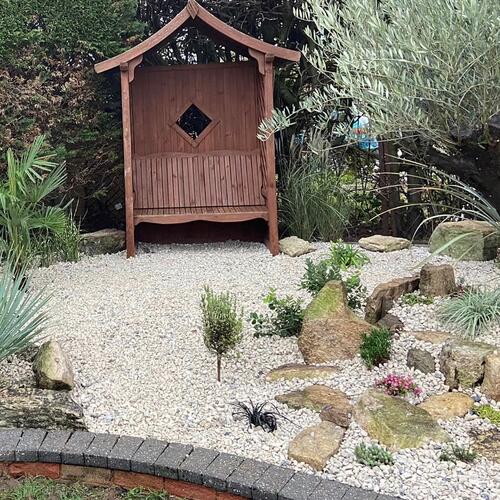
6. Rock Gardens and Alpine Gardens
Natural Look: Gravel and chippings are ideal for rock gardens and alpine gardens, providing a natural, rugged look that mimics mountainous terrain.
Plant Support: They offer a stable environment for alpine plants and succulents, which often prefer well-drained soil conditions.
7. Water Features
Base Material: Use gravel around ponds, fountains, and other water features to create a natural-looking base and to aid in drainage.
Aesthetic Enhancement: Gravel can enhance the appearance of water features by adding texture and colour.
8. Patios and Seating Areas
Cost-Effective Surface: Gravel is a cost-effective alternative to paving for creating patios and seating areas.
Flexible Design: It allows for flexible design options and can be easily rearranged or topped up.
9. Drainage Solutions
French Drains: Use gravel in French drains to improve drainage in areas prone to waterlogging.
Dry River Beds: Create dry river beds with gravel to manage runoff and direct water flow through the garden.
10. Garden Art and Features
Zen Gardens: Gravel is a key element in Japanese Zen gardens, where it is raked into patterns to represent water ripples.
Focal Points: Use gravel to highlight garden features such as statues, sculptures, or garden art.
11. Play Areas
Safe Surface: Gravel can be used as a safe and durable surface for children's play areas, especially for areas around play equipment.
Shock Absorption: Small, rounded gravel pieces can provide some shock absorption, reducing the risk of injury from falls.
12. Fire Pits
Base Material: Create a stable, non-flammable base for fire pits using gravel.
Aesthetic Surround: Use gravel to create an attractive surround for your fire pit area.
Tips for Using Gravel and Chippings:
Weed Barrier: Consider using a weed barrier fabric underneath the gravel to further prevent weed growth.
Edging: Install edging to keep gravel contained within the desired area and prevent it from spreading into other parts of the garden.
Depth: Ensure an adequate depth of gravel (typically 2-3 inches) to provide good coverage and functionality.
Regular Maintenance: Rake and top up gravel periodically to maintain its appearance and effectiveness.
By incorporating gravel and chippings into various aspects of your garden, you can achieve a blend of functionality and aesthetic appeal while ensuring low maintenance and durability.
How to DIY a Garden Border
Creating a garden border with gravel and chippings is a straightforward DIY project that can significantly enhance the look of your garden while helping to define spaces and control weed growth. Here’s a step-by-step guide to help you create a garden border with gravel and chippings:
Materials Needed:
- Gravel or chippings of your choice
- Edging material (plastic, metal, wood, or stone)
- Weed barrier fabric (optional but recommended)
- Shovel
- Rake
- Garden hose or string (for marking)
- Landscape pins or stakes (for securing weed barrier fabric)
- Wheelbarrow (for transporting materials)
- Gloves and safety goggles (for protection)
Steps:
Plan and Mark the Border:
Design: Decide on the shape and location of your garden border. Straight lines are easier, but curves can add a nice aesthetic.
Marking: Use a garden hose or string to outline the border area. This gives you a visual guide to follow.
Prepare the Ground:
Digging: Use a shovel to dig out the marked area to a depth of about 4-6 inches. This will depend on the height of your edging material and the thickness of the gravel layer you want.
Remove Sod and Debris: Remove any existing sod, weeds, and debris from the dug-out area.
Install Edging:
Select Edging Material: Choose an edging material that complements your garden’s style (e.g., plastic, metal, wood, stone).
Installation: Install the edging along the marked border. Make sure it is secure and stands vertically to prevent gravel from spilling out. For plastic or metal edging, you may need to use stakes to keep it in place.
Lay Weed Barrier Fabric (Optional):
Cut to Fit: Cut the weed barrier fabric to fit the dug-out area.
Secure Fabric: Lay the fabric over the soil and secure it with landscape pins or stakes. This step helps prevent weed growth and keeps the gravel clean.
Add Gravel or Chippings:
Transport Gravel: Use a wheelbarrow to transport the gravel or chippings to the border area.
Spread Evenly: Pour the gravel or chippings into the border area and spread it evenly with a rake. Aim for a depth of about 2-3 inches to provide good coverage and weed suppression.
Level and Compact:
Levelling: Use the rake to level the gravel or chippings. Make sure it is evenly distributed and fills the entire border area.
Compact: Lightly compact the gravel by walking over it or using a tamper. This helps to stabilize the surface.
Final Touches:
Clean Edging: Ensure the edging is visible and not buried under the gravel. This helps maintain a neat appearance.
Inspect and Adjust: Inspect the border for any low spots or uneven areas and add more gravel or adjust as necessary.
Maintaining Gravel & Chippings in Your Garden
Maintaining gravel and chippings in your garden involves several routine tasks to keep them looking neat, functional, and attractive. Here are some tips and best practices for maintaining gravel and chippings:
1. Regular Raking
Level Surface: Regularly rake the gravel to keep the surface level and distribute the stones evenly. This helps prevent uneven areas and maintains a uniform appearance.
Debris Removal: Use a rake to remove leaves, twigs, and other debris that can accumulate on the surface.
2. Weed Control
Preventative Measures: Lay a weed barrier fabric under the gravel during installation to prevent weed growth. This fabric helps reduce the amount of weeding needed.
Manual Weeding: Regularly inspect the area and remove any weeds that manage to grow through the gravel. Pull weeds by hand or use a hoe for larger areas.
Herbicides: For persistent weeds, consider using a weed killer or herbicide, but use it sparingly and according to the manufacturer's instructions to avoid harming nearby plants.
3. Top Up Gravel
Annual Check: Check the gravel depth annually and add more gravel or chippings as needed to maintain the desired depth and coverage.
Filling Low Spots: If you notice low spots or areas where the gravel has thinned out, add additional material to keep the surface even and well-covered.
4. Cleaning and Washing
Remove Stains: If the gravel becomes stained or discoloured, you can wash it with a garden hose. Use a spray nozzle to help dislodge dirt and debris.
Deep Cleaning: For a more thorough cleaning, consider using a pressure washer. This can help remove deeper dirt and grime, but be careful not to displace too much gravel.
5. Edge Maintenance
Maintain Edging: Ensure that the edging around the gravel area remains intact and secure. This helps keep the gravel contained and prevents it from spilling into unwanted areas.
Repair Edging: Repair or replace any damaged edging as needed to maintain a clean boundary.
6. Pest Control
Deterring Pests: Some pests may be attracted to gravel areas. Keep the area clean and free of food debris to deter animals like ants and rodents.
Insecticides: If you have issues with insects, consider using an appropriate insecticide, but be mindful of its impact on the environment and surrounding plants.
7. Seasonal Care
Fall Maintenance: In the fall, clear away fallen leaves promptly to prevent them from decomposing and creating a messy, slippery surface.
Winter Care: In winter, keep an eye on snow and ice buildup. Gravel paths can be shovelled or swept, but avoid using salt as it can damage the gravel and nearby plants.
8. Pathway Maintenance
Re-defining Paths: Over time, gravel paths may spread or lose definition. Periodically re-define the edges of pathways to keep them looking neat and purposeful.
Compaction: Lightly compact the gravel occasionally to keep it stable, especially on paths and high-traffic areas. You can do this by walking on it or using a tamper.
9. Regular Inspection
Routine Checks: Regularly inspect the gravel areas for signs of wear, displacement, or contamination.
Quick Fixes: Address any issues promptly to prevent small problems from becoming larger maintenance tasks.By following these maintenance tips, you can keep your gravel and chippings in excellent condition, ensuring they remain an attractive and functional part of your garden. Regular upkeep will also help extend the life of your gravel installations and maintain their aesthetic appeal.