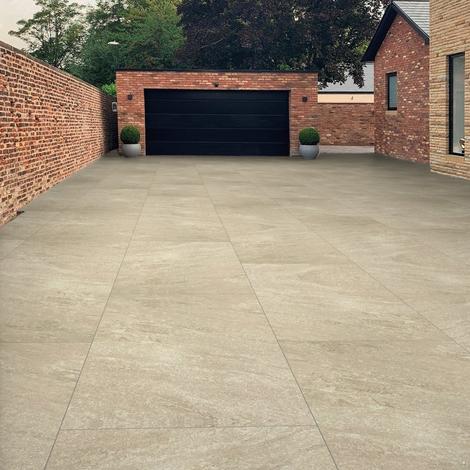
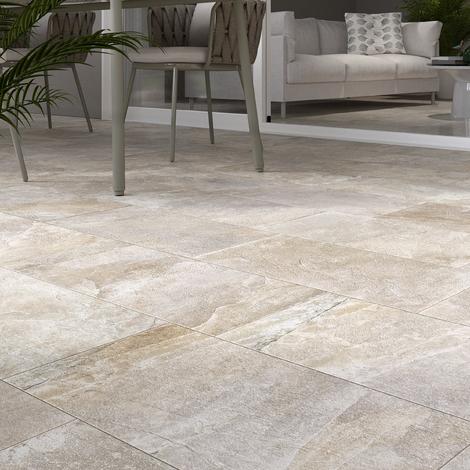
Caliza Beige Porcelain Tiles
The Caliza Porcelain Tiles are a brand-new addition to Stone Zone's ever-expanding Porcelain Range. This collection offers timeless, classic colours that seamlessly complement a variety of garden designs. The Caliza range includes the popular Beige, as well as Anthracite and Gris tiles.
Designed with precision, the Caliza Tiles mimic the appearance of natural stone, providing an authentic look that stands out from more uniform designs.
For indoor spaces, the 9mm Caliza Tiles are ideal for living rooms, kitchens, bedrooms, and studies. These tiles add a touch of elegance and comfort to any interior. For outdoor spaces, the 20mm Caliza Porcelain Slabs are perfect for gardens and patios. Using both indoor and outdoor tiles in the same colour allows for a cohesive and seamless aesthetic throughout your entire property.
How to Purchase Beige Porcelain
900 x 600 sqm in 5.4 sqm Packs
Indoor Tiles - 9mm depth
Outdoor Slabs - 20mm depth
Also available to pick up from our depots in Ferndown, Bournemouth, and Dorchester.
Visit the Christchurch Showroom if you want to see the Caliza Porcelain Tiles slabs face to face.
For many years we have seen the rising popularity of Beige Paving, and for good reason. With the increasing appreciation for minimalism and quiet luxury, Beige and Cream tones have become the latest home and garden trend. The Caliza Beige Indoor Tiles are ideal if you want to create an understated yet luxurious look, that will pair well with a whole host of colour palettes. Once properly installed, Caliza Indoor Tiles are long-lasting and durable, making them a smart long-term investment. You can be confident that your flooring will not need to be replaced for many years, regardless of the amount of foot traffic it receives. Porcelain Tiles are inherently stain-resistant due to their manufacturing process. This resistance makes them ideal for high-use areas like kitchens and bathrooms where spills and stains are common. Additionally, these tiles require minimal maintenance. After installation, the only upkeep needed is regular sweeping to keep dirt and debris at bay, ensuring your tiles remain pristine with minimal effort. As mentioned before, Beige and Cream paving slabs have become extremely popular in modern homes. Due to Beige being a muted colour, you will have a lot of different styles and design options to play with, giving you lots of choices. These Beige Porcelain Slabs are expertly crafted to endure both frost and high temperatures, making them ideal for England's unpredictable weather. Being impermeable, these garden slabs prevent water absorption, ensuring any spilt liquids can be easily wiped away without leaving stains. This feature makes them exceptionally low-maintenance and perfect for outdoor settings. These slabs seamlessly integrate with other garden features like fresh turf, artificial grass, and decorative stones, allowing you to create a cohesive and visually appealing outdoor space. Moreover, these slabs are resistant to grime, mould, and stains. Their resilience makes them an excellent choice for family homes where spills are common. They are also suitable for gardens with trees and pets, as they can be easily cleaned. Finally, these cream pavers are rated R11 for slip resistance, ensuring safety during rainy seasons and around swimming pools. This slip-resistant feature adds an extra layer of security, making them a practical choice for any garden. Installing indoor porcelain tiles can be a meticulous task, so we recommend hiring a professional for the best results. However, if you are an experienced DIY enthusiast looking to tackle a bigger project, our guide will help you get started. Materials and Tools Needed: Clean the Subfloor: Ensure the subfloor is clean, dry, and level. Remove any old flooring, debris, or adhesive residues. Repair Any Damage: Fix any cracks or uneven areas in the subfloor. If the subfloor is wooden, make sure it is sturdy and free from rot or damage. Install a Tile Backer Board: For added stability and moisture protection, consider installing a cement backer board over the subfloor. Secure it with appropriate screws and tape the seams with fibreglass mesh tape. Measure the Area: Measure the room and calculate the number of tiles needed, accounting for cuts and wastage. Dry Layout: Lay out the tiles on the floor without adhesive to determine the best arrangement and minimize cuts. Use a chalk line to mark the center of the room and create a reference point for laying the tiles. Check for Level: Use a level to ensure the surface is even. If necessary, use a self-levelling compound to even out any low spots. Mix the Adhesive: Prepare the tile adhesive according to the manufacturer's instructions. Spread the Adhesive: Using a notched trowel, spread the adhesive over a small section of the floor, starting at the center. Hold the trowel at a 45-degree angle to create ridges in the adhesive. Set the Tiles: Place the first tile at the intersection of the chalk lines. Press it firmly into the adhesive, giving it a slight twist to ensure good contact. Use Tile Spacers: Insert tile spacers between tiles to maintain even spacing and straight grout lines. Continue Laying Tiles: Continue laying tiles, working in small sections. Check periodically with a level to ensure the tiles are even. Cut Tiles as Needed: Use a tile cutter or wet saw to cut tiles to fit along the edges and around obstacles. Let the Adhesive Cure: Allow the adhesive to set according to the manufacturer's instructions, usually 24 hours. Mix the Grout: Prepare the grout according to the manufacturer's instructions. Apply the Grout: Using a grout float, spread the grout over the tiles, pressing it into the joints at a 45-degree angle. Remove excess grout with the float. Clean the Tiles: After the grout has been set for about 15-30 minutes, clean the tiles with a damp sponge to remove grout residue. Rinse the sponge frequently. Final Cleaning: Once the grout has fully cured (typically 24 hours), do a final cleaning to remove any grout haze from the tile surface. Apply Grout Sealer: To protect the grout from stains and moisture, apply a grout sealer according to the manufacturer's instructions. Remove Spacers: Once the grout is dry, remove the tile spacers. Caulk Edges: Apply caulk along the edges where the tiles meet walls, cabinets, or other surfaces to create a clean, finished look and provide flexibility.Read More...
Caliza Beige Indoor Porcelain Tiles
Caliza Beige Outdoor Porcelain Slabs
How to Install Caliza Beige Indoor Porcelain Tiles
Step 1: Prepare the Surface
Step 2: Plan Your Layout
Step 3: Apply the Adhesive
Step 4: Lay the Tiles
Step 5: Grout the Tiles
Step 6: Seal the Grout (Optional)
Step 7: Finishing Touches
Buy With Confidence
- Our paving can be purchased in quantities of 5.4 square metres.
- Please enter the amount of 5.4 sqm you need (for example 20sqm would be 4 x 4.4sqm).
- All of our paving comes in crates which can be easily placed into a van or into a garden using a hiab lorry.
- You can choose a free collection from one of our Depots or fuss-free, home delivery.
A Service You Can Rely On
- Our trustworthy service offers prompt delivery to any area in the UK
- Stone Zone is a family-run business that has been well-established since 1998
- Our knowledgeable customer advisors can help you with your purchase
- We pride ourselves on offering a range of affordable garden supplies
Sample slabs are available in-store, please ask a customer advisor.
Delivery information
Related Blog Article
Porcelain Paving Guide
With so many varieties of Porcelain Paving to choose from, it can feel a bit daunti …


