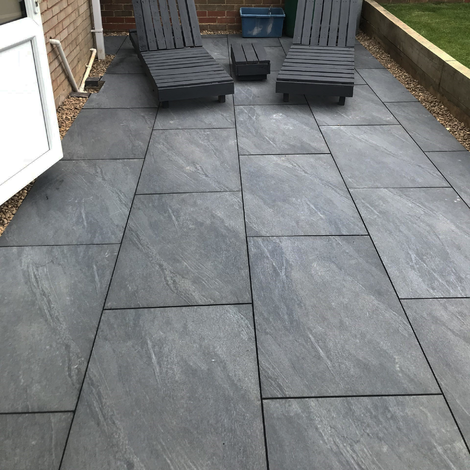
Caliza Anthracite Porcelain Tiles
The Caliza Porcelain Tiles are a brand-new addition to Stone Zone's ever-expanding Porcelain Range. The Caliza Porcelain Tiles range boasts classic, well-loved colours that will complement the full spectrum of garden designs. Alongside the Anthracite, this collection also contains Beige and Gris tiles.
The Caliza Tiles have been carefully designed to emulate natural stones to give your space a more authentic look compared to a more uniform design.
The 9mm Indoor Tiles are perfect for areas such as your Living Room and Kitchen or more cosy areas such as your bedroom or study. Whereas the 20mm Outdoor Porcelain Slabs have been created for gardens and patios. Having both options in the same colour will enable you to create a seamless look throughout your entire property.
How to Purchase Caliza Anthracite Porcelain
900 x 600 sqm in 5.4 sqm Packs
Indoor Tiles - 9mm depth
Outdoor Slabs - 20mm depth
Also available to pick up from our depots in Ferndown, Bournemouth, and Dorchester.
Visit the Christchurch Showroom if you want to see the Caliza Porcelain Tiles slabs face to face.
If you prefer darker colours and a more monochromatic look in your home, then look no further than the Caliza Anthracite Porcelain Tiles. The Anthracite Porcelain Tiles are a perfect addition to any modern home. Once properly installed the Caliza Indoor Tiles are long-lasting and durable, making them a long-term investment. You can be worry-free that your flooring will not need to be replaced for many years to come no matter how much footfall they get. Porcelain Tiles are always stain-resistant due to how they are developed. Being resistant to staining means that these tiles are perfect for areas such as kitchens and bathrooms. In the same vein, these Tiles are also very low-maintenance. Once they are laid there really isn't any maintenance needed apart from regular sweeping to keep dirt and debris away. Dark Grey has long been a popular choice for gardens and patios. Charcoal slabs are easy to match with a range of colour palettes in your garden, giving you the freedom to design your garden how you want it. These Anthracite Porcelain Slabs have been carefully designed to withstand both frost and hot, thermal weather without any damage. This is extra handy because of England's temperamental weather. These garden slabs are impermeable, meaning that water cannot be absorbed through them. This ensures that your slabs if any liquid does get spilled on these slabs, they can easily wiped away rather than getting stained. These slabs will work well with other garden features such as Fresh Turf, Artificial Grass, Decorative Stones and more, allowing you to create a complete, cohesive garden. Furthermore, these slabs are grime, mould and stain resistant. Being resistant to these substances makes the Anthracite slabs perfect for family homes where spillages are a common occurrence; it also means that if there are a lot of trees and pets around, you can rest assured that your patio can be easily cleaned. Finally, these dark grey pavers have been rated to be R11 slip-resistant meaning there's no risk of slipping during rainy season and if they've been laid by a swimming pool. Installing indoor Porcelain tiles can be a finicky job and ideally, we'd recommend you hire a professional to undertake this project. However, if you are an experienced DIY-er and want to take on a larger project then read through our guide to help you get started. Materials and Tools Needed: Clean the Subfloor: Ensure the subfloor is clean, dry, and level. Remove any old flooring, debris, or adhesive residues. Repair Any Damage: Fix any cracks or uneven areas in the subfloor. If the subfloor is wooden, make sure it is sturdy and free from any rot or damage. Install a Tile Backer Board: For added stability and moisture protection, consider installing a cement backer board over the subfloor. Secure it with appropriate screws and tape the seams with fiberglass mesh tape. Measure the Area: Measure the room and calculate the number of tiles needed, accounting for cuts and wastage. Dry Layout: Lay out the tiles on the floor without adhesive to determine the best arrangement and minimize cuts. Use a chalk line to mark the center of the room and create a reference point for laying the tiles. Check for Level: Use a level to ensure the surface is even. If necessary, use a self-leveling compound to even out any low spots. Mix the Adhesive: Prepare the tile adhesive according to the manufacturer's instructions. Spread the Adhesive: Using a notched trowel, spread the adhesive over a small section of the floor, starting at the center. Hold the trowel at a 45-degree angle to create ridges in the adhesive. Set the Tiles: Place the first tile at the intersection of the chalk lines. Press it firmly into the adhesive, giving it a slight twist to ensure good contact. Use Tile Spacers: Insert tile spacers between tiles to maintain even spacing and straight grout lines. Continue Laying Tiles: Continue laying tiles, working in small sections. Check periodically with a level to ensure the tiles are even. Cut Tiles as Needed: Use a tile cutter or wet saw to cut tiles to fit along the edges and around obstacles. Let the Adhesive Cure: Allow the adhesive to set according to the manufacturer's instructions, usually 24 hours. Mix the Grout: Prepare the grout according to the manufacturer's instructions. Apply the Grout: Using a grout float, spread the grout over the tiles, pressing it into the joints at a 45-degree angle. Remove excess grout with the float. Clean the Tiles: After the grout has set for about 15-30 minutes, clean the tiles with a damp sponge to remove grout residue. Rinse the sponge frequently. Final Cleaning: Once the grout has fully cured (typically 24 hours), do a final cleaning to remove any grout haze from the tile surface. Apply Grout Sealer: To protect the grout from stains and moisture, apply a grout sealer according to the manufacturer's instructions. Remove Spacers: Once the grout is dry, remove the tile spacers. Caulk Edges: Apply caulk along the edges where the tiles meet walls, cabinets, or other surfaces to create a clean, finished look and provide flexibility.Read More...
Caliza Anthracite Indoor Porcelain Tiles
Caliza Anthracite Outdoor Porcelain Slabs
How to Install Caliza Anthracite Indoor Porcelain Tiles
Step 1: Prepare the Surface
Step 2: Plan Your Layout
Step 3: Apply the Adhesive
Step 4: Lay the Tiles
Step 5: Grout the Tiles
Step 6: Seal the Grout (Optional)
Step 7: Finishing Touches
Buy With Confidence
- Our paving can be purchased in quantities of 5.4 square metres.
- Please enter the amount of 5.4 sqm you need (for example 20sqm would be 4 x 4.4sqm).
- All of our paving comes in crates which can be easily placed into a van or into a garden using a hiab lorry.
- You can choose a free collection from one of our Depots or fuss-free, home delivery.
A Service You Can Rely On
- Our trustworthy service offers prompt delivery to any area in the UK
- Stone Zone is a family-run business that has been well-established since 1998
- Our knowledgeable customer advisors can help you with your purchase
- We pride ourselves on offering a range of affordable garden supplies
Sample slabs are available in-store, please ask a customer advisor.
Delivery information
Related Blog Article
Porcelain Paving Guide
With so many varieties of Porcelain Paving to choose from, it can feel a bit daunti …


